
Today we will learn how to create cool signatures and how to animate them into a nice looking gif as the one below. We will focus on creating the ice looking background and the shine animation.
This is a step by step tutorial with images and if you ever get stuck during the way make sure that you check the pictures under each step as they can help you understand better what's going on.

NOTE !!! For this tutorial I've used a font called Blade 2 that you can download here
To install it just extract the file 'Blade 2.ttf' and place it into your Windows > Fonts folders.
So let's get started
Step 1: Open Adobe Photoshop and Create a New document having 350 Width and 150 Height:

Step 2: Press on Create a New Layer button to create a layer. I named it Ice:

Step 3: Make sure your Foreground color is Black and your Background colors is White then go to Filter > Render > Clouds:

Step 4: Now go to Filter > Render > Difference Clouds:

Step 5: Press CTRL+F a few times (about 10 times) to repeat the Difference Clouds until you end with something like this:

Step 6: Right click on our Ice layer, select Blending Options and modify the following:
Inner Glow:

Gradient Overlay:

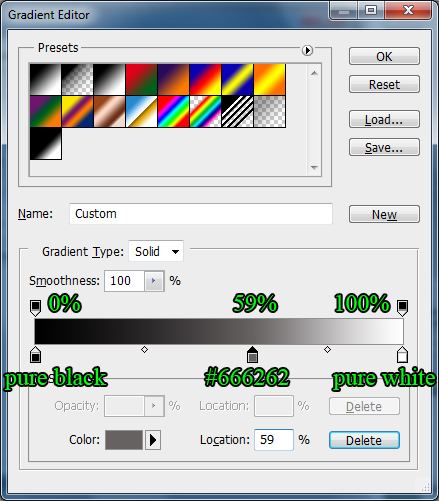
Gradient colors:
Pattern Overlay (use the Black Marble pattern found in Rock Patterns):

You should end up with something like this:

Step 9: With the Type tool create your text, use the Blade 2 font and a dimension of 80 pt.

Step 10: Right click our Text layer then go to Blending Options and modify the following:
Drop Shadow:

Inner Shadow:

Outer Glow (color pure black):

Inner Glow:

Color Overlay:

Gradient Overlay:

Step 11: CTRL+CLICK on your text layer to make a selection of it, then go to Select Menu > Modify > Contract and choose 1 pixel:

Step 12: Create a New Layer and fill the selection with Black.

Step 13: Right click this new 'Inner Text' layer, go to Blending Options and apply a Gradient Overlay:

Step 14: Press OK then modify this inner text layer Fill amount to 0% (under Opacity). You should end up with something like this:

Step 15: Add a Color Balance Adjustment Layer:

Step 16: Change the following settings:
Shadows : -100 , -15 , +8
Midtones: -41, -24, +23
Highlights : -43, -20, +23

Step 17: Create a New Layer, name it Shine, then select the Rectangular Marquee Tool (M) and create a new selection like in the image below:

Step 18: Select the Gradient Tool (G), make sure that the color is White and the other is transparent, use a reflected gradient and make a gradient inside the selection, (similar to mine). Then hit CTRL+D to deselect.

Step 19: With the Shine Layer selected CTRL+CLICK onto our Text layer (not the inner one) to make a Selection of it.

Step 20: Now press on Add Layer Mask to add a Mask into the Shine layer. Press onto the chain link between the layer and the mask to unlink it (THIS IS VERY IMPORTANT - otherwise it won't work):

TURN THIS (by pressing onto the chain link between the layers)

INTO THIS:

Step 21: Go to Window > Animation to enable the Animation Slider:

Step 22: Now press on Duplicate selected frames to make a copy of our first frame.

Step 23: Into the SECOND FRAME make sure your Shine layer is selected (Make sure it's not your mask) and move it to the right (you should see the shine onto the text) until it reaches the end of the text and you can't see it anymore:

Step 24: Now press on Twin Animation Frames button and add 15 Frames:

Step 25: Now you can press the play button and see the Shine animation into our image. To save it as a GIF go to File > Save For Web & Devices (ALT+SHIFT+CTRL+S) and make sure the image type is a GIF and the Looping Animation is selected to Forever:

And that's all ! We have created a nice looking animated signature with a few filters, a cool font and some basic animations that include movement. You can also add images with characters onto your icy background to make a custom signature, change the colors into the Color Balance layer and why not even change the font to match the theme.
Here is my result:

If you got any question about this tutorial please post it into the facebook comment section below. Also feel free to comment or tell me your opinion, or add your results of this tutorial.
To upload gifs use www.imageshack.us and use the links after the upload to post the signature into forums or websites.
Hope this helped you guys. See you next time with another tutorial!