
Today I will show you how to create awesome looking logos that you can use for websites, signatures, backgrounds or anything else. The first thing that we'll need to do is to have the concept of the logo in mind to know what we're creating in 2D so we can then make that a 3D object, but for the sake of this tutorial, just to show the method that most of the people are using in 3D softwares I will try to replicate the logo of a famous brand and in this case the Volkswagen logo because it's not that complicated but also not that easy, all is done inside 3Ds MAX and you don't need any plugins for doing it.
So this is our logo that we're trying to make in 3D.

The first step would be to save the reference image to your computer so we can later import it into 3D. I must mention that you have to check the images for a better understanding of what's going on, you can press the middle mouse button to open the images inside a new tab (press the scroll) because it's easier to read the tutorial into a new tab and to watch the image in the other, but in the end it's up to you. The tutorial is pretty basic but it requires some experience in 3Ds MAX, I will try to explain the steps as well as I can but if you get stuck on the way even if you check the images don't hesitate to ask questions into the comment section below and I will try to help you get this tutorial to an end. So let's get started
Step 1: Inside 3Ds MAX create a plane that matches the dimensions of the image you are trying to replicate. So in our case our image is almost a perfect square, it has 1003x1030 pixels and we will create a plane that matches this dimensions. To do that go to the Create Tab > Geometry and pick Plane then drag a plane into the top view, after that go to the Modify Menu and change it's Length to 1003 and it's Width to 1030 and modify the Length Segments to 1 and the Width segments also to 1.
You should have something like this:

Step 2: Press M to bring up the material editor and inside a new Standard material click the Diffuse box (no. 1 inside the picture) and choose a Bitmap (no. 2 in the picture) from the list to assign a bitmap to the Diffuse color. Now as soon as you click the Bitmap you will be asked for an image to assign, choose the VW reference logo that you have downloaded from above.

Choose the Volkswagen.jpg and press Open:

Step 3: Now make sure that the Plane is selected in the viewport and press the Assign Material to Selection button (1) then to see it in the viewport press Show Standard Map in Viewport (2).


Now right click the plane and hit Freeze Selection:


1,2,6 corners and 3,4,5 as smooth.

This is the menu where you can change the points (by right clicking one or more vertices this one pops up).

Now continue to add more lines by going again to the Create Tab > Shapes > Line and create the other lines of the logo. In the end we will attach all the lines into one shape.
NOTE!!!
I always add corners and modify them later because you can't get the right shape from the start so don't bother making them perfect from the beginning. You can also add later points with the Refine button on the right pannel inside the Modify tab.
As you can see below only the next vertices are Smooth: 3,4,5 and 11,12,13 the rest are corners:


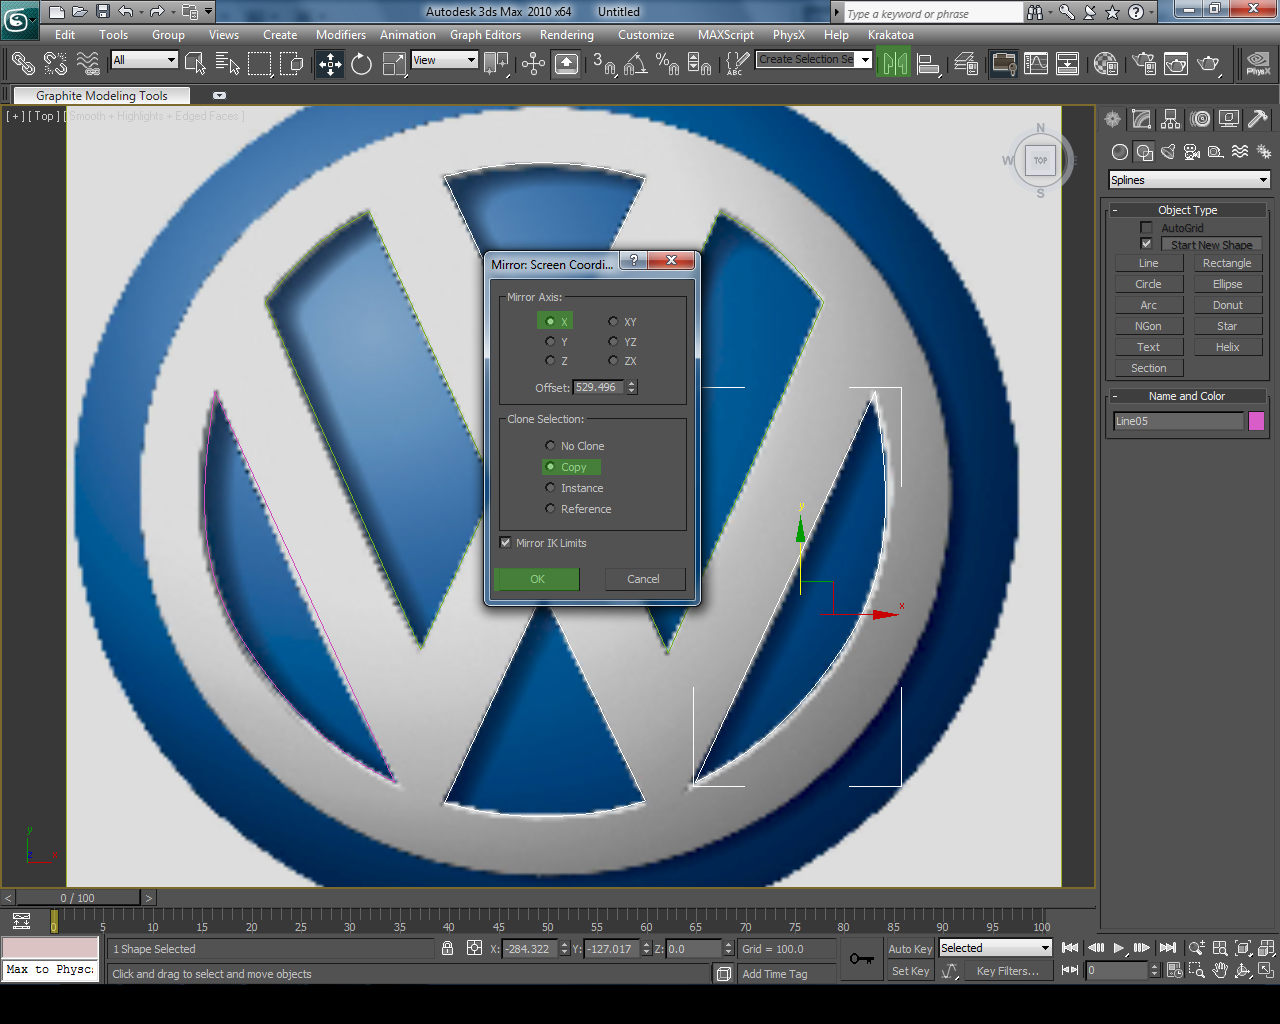
Step 6: Now if we study our logo we can see that some of the parts are similar so we don't need to make them again, only to flip them:

So first select the top part go to Mirror then select the correct axis to flip which is Y in our case, make sure Copy is selected as well and then move it manually into place to match the logo.
(the offset value s not correct, it's just to move the top part a little to the bottom!)

Do the same for the left side part, select it go to Mirror > X > Copy, choose an Offset value to move it a bit then move it manually into place.
Step 7: Now we're done with the letters. It's time to make the outer circle. Go to Create > Shapes > Circle.

And create a circle to match the outline of the logo, then change the steps to 24 to be smoother.

Step 8: Now select the circle, right click it and convert it into an Editable Spline:

Now inside the Modify Tab press on Attach and click on each of the following shapes to attach them to the circle:

Step 9: Now add a Bevel modifier on top:

With the following settings:
Level 1 -- Height: 15, Outline: 0
Level 2 -- Height: 2, Outline -2

Now use a metal material to render and you should get something similar to this:

You can use this technique to create any other kind of logo, if it's complicated all you need to do is split it into parts and then attach them together and use a bevel modifier to create the extrusion with the offset. As you have seen in this tutorial the Line tool is similar to the Pen tool in Adobe Photoshop and it's not that complicated to use. Also Splines are really powerful because they can provide 3D geometry that can be changed entirely only by moving a vertex, so keep in mind that sometimes Splines are an easier approach than polygons.
So that would be all for today, hope this tutorial helped and if you have any question please post it into the comment section below.
See you next time !
V3N0MX